Accessing native libraries using the JNI
Keywords:
Java,
Script,
Java Native Interface,
JNI,
external library,
native library
Author(s): Sabine Webel
Date: 2009-06-26
Summary: This tutorial explains how to access external (native) libraries within a Script node in Instant Player using the Java Native Interface (JNI). The JNI is a programming framework that allows Java to call methods of platform specific (native) libraries written in other languages (e.g. C, C++). This tutorial is based on the Breaking out of the Java Sandbox and the Implementing Script nodes in JavaScript tutorial. It assumes that the reader knows how to use a Java class inside a Script node and how to create and handle .java.policy files.
Preparing the Java class
The Java Native Interface (JNI) is a powerful feature of the Java platform that allows Java code running in a Java Virtual Machine (JVM) to call methods of native applications and libraries, such as Windows-DLLs or Linux shared libraries. In the opposite direction the JNI also enables Java code to be called by those applications and libraries which may also be written in other programming languages such as C, C++ or assembly. To access a native method inside Java at first the library must be declared as "native" in the Java class. Then the library must be loaded by calling System.loadLibrary("<name of the library>"). This may look like:
Code: Making the native library accessible
public class HelloWorldJNI extends vrml.node.Script
{
    native void function1();

    static
    {
        System.loadLibrary("HelloWorldJNI");
    }
    ...
}
Warning: The directory where the native library, that is loaded in the Java code, is located must be included in the PATH.
After the compilation of the Java program a JNI-style header file must be generated using the javah tool that comes with the Java Development Kit (JDK). This can be done by calling
javah -jni <Java class name>
Creating the JNI functions
In the JNI native functions are implemented in separate C or C++ files (i.e. *.c or *.cpp). A JNI function may look like the following:
Code: JNI function
JNIEXPORT void JNICALL Java_JavaClassName_MethodName (JNIEnv *env, jobject obj)
{
    /*Implementation of the Native Method*/
}
The name of the JNI function is composed of three components: a Java prefix, the name of the Java class where the JNI function shall be called and the native method name. More information about the JNICALL, the JNIEnv pointer and the jobject reference can be found in the Java Native Interface Specification. To follow the example in the section above the HelloWorldJNI.function1 method can be impelemented in C++ as follows:
Code: HelloWorldJNI
#include <stdio.h>
#include <jni.h>
#include "HelloWorldJNI.h"

JNIEXPORT void JNICALL Java-HelloWorldJNI_function1(JNIEnv *env, jobject obj)
{
    printf("HelloWorld\n");
    return;
}
- stdio.h: Just because printf is used, not JNI specific.
- jni.h: Provides information for calling JNI functions. Must be included when writing native methods.
- HelloWorldJNI.h: Header file that is generated using javah. Includes the prototype for the Java_HelloWorldJNI_function1 method.
The jni.h and <MyJavaClass>.h must always be included in the C/C++ files where the JNI functions are written. To get the native library that can loaded in the Java code, all corresponding sources must be compiled.
Passing arguments and returning values
To pass arguments from the Java program to the native methods and vice versa, native types can be mapped to/from Java types. Primitive types such as int, float and bool can simply be copied. Compound types like e.g. objects, arrays and string must be explicitly converted by using JNIEnv methods. The following table shows the mapping between Java Language Types and the Native Types:
| Java Language Type | Native Type | Description |
|---|---|---|
| boolean | jboolean | unsigned 8 bits |
| byte | jbyte | signed 8 bits |
| char | jchar | unsigned 16 bits |
| short | jshort | signed 16 bits |
| int | jint | signed 32 bits |
| long | jlong | signed 64 bits |
| float | jfloat | 32 bits |
| double | jdouble | 64 bits |
Here you can see a simple example how to convert arguments and return values in the JNI implementation and how to access the native functions in Java:
Code: MyDLL.cpp (C++ and JNI)
#include <string.h>
#include <jni.h>
#include "ExampleJNI.h"

char _str[256];
float _color[3][3] = {{1.0,0.0,0.0},{0.0,1.0,0.0},{0.0,0.0,1.0}};
int _counter=0;

//multiply the argument by 2
int function1(int arg)
{
    return(2*arg);
}

//prepend three * to a given sourceString and return the result
char* function2(const char *sourceString)
{
    _str[0]='*';
    _str[1]='*';
    _str[2]='*';
    strcpy(&_str[3],sourceString);
    return(_str);
}

//change color values
float *switchColor()
{
    static float internal_parameters[3];
    _counter=_counter%3;

    internal_parameters[0]=_color[_counter][0];
    internal_parameters[1]=_color[_counter][1];
    internal_parameters[2]=_color[_counter][2];

    _counter++;

    return((float*)internal_parameters);
}

//****************************
//JNI
//****************************
JNIEXPORT jint JNICALL Java_ExampleJNI_function1(JNIEnv *env, jobject obj, jint arg)
{
    jint j_retCode = function1(arg);
    return(j_retCode);
}

JNIEXPORT jstring JNICALL Java_ExampleJNI_function2(JNIEnv *env, jobject obj, jstring sourceString)
{
    const char *s = env->GetStringUTFChars(sourceString, 0);
    const char *retCode = function2(s);
    jstring j_retCode;
    j_retCode = env->NewStringUTF(retCode);
    env->ReleaseStringUTFChars(sourceString, retCode);
    return(j_retCode);
}

JNIEXPORT jfloatArray JNICALL Java_ExampleJNI_switchColor(JNIEnv *env, jobject obj)
{
    float *retCode = switchColor();
    jfloatArray j_retCode = env->NewFloatArray(3);
    env->SetFloatArrayRegion(j_retCode, 0, 3, retCode);
    return(j_retCode);
}
Code: ExampleJNI.java
import vrml.*;
import vrml.field.*;
import vrml.node.*;
import vrml.Event;
import java.lang.String;

public class ExampleJNI extends vrml.node.Script
{
    private vrml.field.SFColor color_changed;

    native int function1(int arg);
    native String function2(String sourceString);
    native float[] switchColor();

    static
    {
        System.loadLibrary("MyDLL");
    }

    public void initialize()
    {
        //get out slot
        color_changed = (vrml.field.SFColor)getEventOut("color_changed");

        //do some stuff
        int myInt = 128;
        System.out.println("Return value function1: "+function1(myInt)+"\n");

        String myString = "My String";
        System.out.println("Return value function2: "+function2(myString)+"\n");
    }
    public void processEvent(vrml.Event e)
    {
        if (e.getName().equals("change_color"))
        {
            vrml.field.ConstSFBool active = (vrml.field.ConstSFBool)e.getValue();
            if (active.getValue())
            {
                float[] col = switchColor();
                System.out.println("SwitchColor: "+col[0]+", "+col[1]+", "+col[2]+"\n");
                color_changed.setValue(col);
            }
        }
    }
    public void shutdown() {}
}
Code: ExampleJNI.x3d
<?xml version="1.0" encoding="UTF-8"?>
<!DOCTYPE X3D PUBLIC "ISO//Web3D//DTD X3D 3.0//EN" "http://www.web3d.org/specifications/x3d-3.0.dtd">
<X3D xmlns:xsd='http://www.w3.org/2001/XMLSchema-instance' profile='Full' version='3.0' xsd:noNamespaceSchemaLocation='http://www.web3d.org/specifications/x3d-3.0.xsd'>
  <Scene DEF='scene'>
    <Viewpoint position='0 0 7'/>
    <Group>
      <TouchSensor DEF='ts'/>
      <Shape>
        <Appearance>
          <Material DEF='mat' diffuseColor='0 0 1'/>
        </Appearance>
        <Sphere radius='0.5'/>
      </Shape>
    </Group>
    <Script DEF='script' url='"ExampleJNI.class"' directOutput='true' mustEvaluate='true'>
      <field accessType='inputOnly' name='change_color' type='SFBool'/>
      <field accessType='outputOnly' name='color_changed' type='SFColor'/>
    </Script>
    <ROUTE fromNode='script' fromField='color_changed' toNode='mat' toField='set_diffuseColor'/>
    <ROUTE fromNode='ts' fromField='isActive' toNode='script' toField='change_color'/>
  </Scene>
</X3D>
Code: ExampleJNI.wrl
#VRML V2.0 utf8
Group {
    children [
        DEF	ts TouchSensor {}
        Shape {
            appearance Appearance {
                material DEF mat Material {
                    diffuseColor 0 0 1
                }
            }
            geometry Sphere {
                radius .5
            }
        }
    ]
}
DEF script Script {
    directOutput TRUE
    mustEvaluate TRUE
    eventIn SFBool change_color
    eventOut SFColor color_changed
    url "ExampleJNI.class"
}
ROUTE ts.isActive TO script.change_color
ROUTE script.color_changed TO mat.diffuseColor
Make it run in InstantPlayer
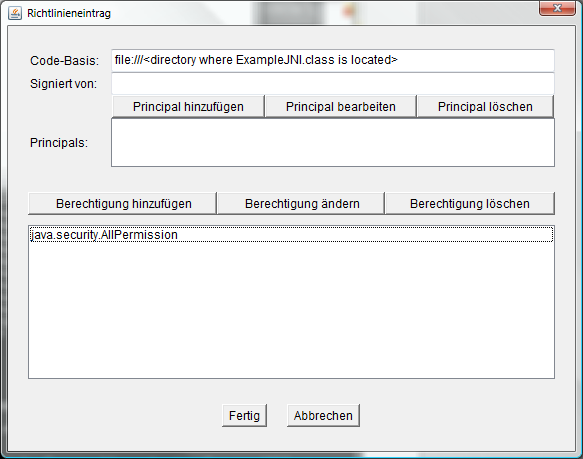
To make the example run in InstantPlayer, at first the Java code must be compiled and the header file ExampleJNI.h must be generated. Then you have to compile the C++ sources and copy the resulting library to the directory where the ExampleJNI.class is located. This directory must also be added to your PATH. As explained in the Breaking out of the Java Sandbox tutorial, a .java.policy file must be generated or edited to add the following security settings:
Create an X3D file that uses your Java class in a Script node (see the Implementing Script nodes in JavaScript tutorial for more details) and run the X3D file in InstantPlayer.
Files:
Comments
This tutorial has no comments.
Add a new comment
Due to excessive spamming we have disabled the comment functionality for tutorials. Please use our forum to post any questions.