Advanced material management and multi-pass
Keywords:
tutorial,
X3D,
world,
rendering,
appearance,
multi-pass,
render state control,
occlusion in AR
Author(s): Yvonne Jung
Date: 2007-04-26
Summary: This tutorial shows some advanced material management features (that amongst others can be used to handle occlusions in AR scenes).
Advanced material management
When looking at games or technical demonstrations of graphics card vendors and reviewing current literature dealing with rendering, one might think that most problems are solved and generalized rendering solutions are standardized and readily available. But currently X3D still does not support such advanced rendering methods. In order to overcome these limitations we present some nodes for advanced rendering techniques like render state control for allowing to easily create and author more realistic 3D worlds.
For complex rendering tasks the user sometimes needs control over the rendering order of different geometries as well as over low-level rendering modes. So, because the Appearance node finally reveals how a rendered Shape node looks like, we extended the X3D shape component with some new nodes for setting different render states and therewith the Appearance node with the appropriate fields. This is necessary, because those settings directly map to the GPU, so no PROTOs are possible here.
First we introduce the SFInt32 field "sortKey" for defining the rendering order, what is essential in combination with e.g. alpha blending and depth writing. Alternatively, one can think about a special ordering group, but this way usage is much more intuitive and is automatically correct for the whole scene graph. For rendering operations which belong closely together as it is the case even for a simple toon shader for non-photorealistic rendering, we also introduce the MultiPassAppearance node as the generalized extension for the X3D TwoSidedMaterial node. The "appearance" field simply contains an ordered sequence of single-pass appearance nodes.
Additionally we propose an AppearanceGroup node, which – as the name implies – extends the Group node with an "appearance" field. This is quite useful if a whole group of nodes should share the same material properties. An example is shown next. Furthermore, the SFBool field render (which b.t.w. is shared by all grouping nodes) simplifies the setting of visibility.
Code: Appearance settings for simple outlined comic material
AppearanceGroup {
	children [
		# all shape nodes etc
	]
	appearance MultiPassAppearance {
		appearance [
			DEF Pass1 Appearance {
				faceMode FaceMode {
					smooth FALSE
					cullFace "back"
					frontMode "fill"
				}
				material Material {
					diffuseColor .7 .7 .7
				}
			}
			DEF Pass2 Appearance {
				lineProperties LineProperties {
					linewidthScaleFactor 6
				}
				material Material {
					diffuseColor 0 0 0
				}
				faceMode FaceMode {
					smooth FALSE
					cullFace "front"
					backMode "line"
				}
			}
		]
	}
}
X3D bindings for multi-pass and group appearances
Below, the right image shows the usage of special materials for rendering the front and back faces beyond X3D's simple TwoSidedMaterial according to the code fragment shown above. In this context you also need the possibility to e.g. disable depth writing, to use different depth functions (which e.g. can be done with the DepthMode), or to do arbitrary blending and discard operations for the compositing of objects.
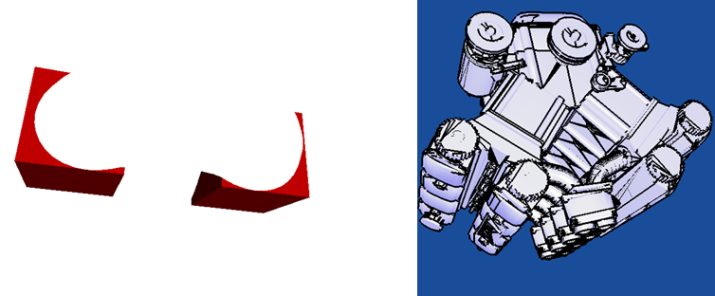
These additional appearance and material nodes can be also used to handle occlusions in AR scenes given that the (real) 3D objects, for which occlusions shall be handled, already exist as (X)3D model. Hence, the left image above shows an application of color masking in combination with using a defined rendering order for achieving the occlusion effects. The corresponding X3D code (again in VRML encoding) is shown below.
As can be seen, only two fields of the geometry's Appearance are parameterized. The ColorMaskMode allows writing to the depth buffer without writing any color values to the framebuffer. This node thereby permits control over color masking – the color channel is written if the corresponding mask field is true. The field "sortKey" (whose default value is "0") is explicitly set to "-1", which means that this object is rendered before all others. This is necessary to initially stamp out the depth buffer without setting the color - otherwise another object (depending on the rendering order) might already have written its color to the framebuffer. Especially in case of an AR application this is an important use case, where one wants to have invisible ghosting objects that are rendered for tracked real reconstructed geometries in order to handle occlusions between real and virtual objects.
Code: Creating invisible ghosting objects
Shape {
	appearance Appearance {
		sortKey -1
		colorMaskMode ColorMaskMode {
			maskR FALSE
			maskG FALSE
			maskB FALSE
			maskA FALSE
		}
	}
	geometry Torus {}
}
In the following, a few other nodes for allowing finer control over the rendering modes are shown. If the corresponding fields in the Appearance node are not set by the user, the player uses standard settings which fit best for the current material, texture or shader to ensure compatibility with the X3D standard. Otherwise the state modes override the default settings.
As the name implies, the BlendMode node allows access to blending and alpha test. The field values, for instance "src_alpha" and "one_minus_src_alpha" for standard alpha blending, map directly to the corresponding rendering state names of the API of the graphics board driver. The fields "alphaFunc" and "alphaFuncValue" specify the conditions under which a fragment is drawn or discarded. For example, with "alphaFunc" set to "lequal" and a given reference value c, the fragment passes if the incoming alpha value is less than or equal to c. Concerning choice and naming conventions, a common subset of the OpenGL and DirectX graphics standards, which have already been very well documented, was chosen. For further information you may want to refer e.g. to the OpenGL Red Book.
The other modes, StencilMode, FaceMode and DepthMode, are likewise almost self-explanatory. The FaceMode can be explained best as being a generalized extension of the "ccw" and "solid" fields of the X3DComposedGeometryNode, since is especially needed in combination with the "sortKey" field or the MultiPassAppearance.
With the DepthMode depth functions can be set as already explained above. The StencilMode permits fine grained control over stencil bit masks and functions. For all fields with default values equal to "-1" or "none", implementation specific default values are used. This way, complex multi-pass appearances as needed for advanced rendering can be created. Moreover, these extensions of the X3DAppearanceChildNode are also useful for other application scenarios, such as for instance image-based CSG operations or, as already mentioned, Augmented Reality applications.
X3D bindings for important render states
Multi-pass rendering in X3D
Multi-pass can basically be understood in two ways. On the one hand it means the ability to dynamically render a partial scene-graph, which does not necessarily need to be part of the original scene, to an offscreen texture, that can then be used for creating effects like reflection and refraction or shadows. In the Xj3D extension documentation a simplified possibility for creating such offscreen images was first proposed with the RenderedTexture node, whose node interface will be described next. On the other hand the term multi-pass denotes the ability to render geometry in an ordered sequence, usually with different drawing operations like blending, depth or stencil enabled, which was already explained above.
Code: RenderedTexture node interface
RenderedTexture : X3DEnvironmentTextureNode {
 SFNode     []       textureProperties NULL
 MFNode     []       excludeNodes []
 SFString   [in,out] update       "NONE"
 SFNode     [in,out] viewpoint    NULL
 SFNode     [in,out] background   NULL
 SFNode     [in,out] fog          NULL
 SFNode     [in,out] scene        NULL
 SFNode     [in,out] foreground   NULL
 MFInt32    [in,out] zOffset      []
 MFNode     [in,out] targets      []
 MFInt32    [in,out] dimensions   [128 128 4 1]
 MFBool     [in,out] depthMap     []
 SFBool     [in,out] readBuffer   FALSE
 SFMatrix4f [out]    projection   identity
 SFMatrix4f [out]    viewing      identity
}
Our extended RenderedTexture node is similar to the GeneratedCubeMapTexture and allows providing the ability for offscreen rendering - including associated buffers like the depth buffer. This special texture node is derived from the X3DEnvironmentTextureNode and has an SFBool field called ``depthMap'', which allows the automatic generation of depth maps for e.g. additional user created shadows. Because this is only useful in combination with appropriate transformation matrices, the projection (modelview projection matrix of camera space) and viewing out-slots (model matrix of parent node) are added.
The only way to persistently change texture data that is already hosted on GPU memory is to directly render into this texture. Hence the field ``targets'' can hold references to all kinds of texture nodes including 3D textures. The field ``zOffset'' defines the z-offset of a slice of the given 3D texture, which allows to render exactly into that layer. To support 3D textures in general, despite the original proposal the ``dimensions'' field now has four parameters for specifying width, height, depth, and pixel type of the texture. Finally, if ``readBuffer'' is true, the framebuffer content is read back into the image.
Using offscreen buffers has the additional advantage that the creation of floating point textures can be forced (likewise with a new texture properties field). This not only allows doing shading calculations with higher precision, but also allows HDR rendering, especially in combination with support for special HDR image formats like OpenEXR and Radiance. However, it is not possible to use X3D pointing sensors or even to navigate directly within an offscreen buffer. Thereto, we extended the X3D scripting API by another method getView() that can return any type of render surface and on which a ray can be shot for implementing interactions.
Files:
Comments
This tutorial has no comments.
Add a new comment
Due to excessive spamming we have disabled the comment functionality for tutorials. Please use our forum to post any questions.