Using PackagedShader with CgFX support
Keywords:
tutorial,
PackagedShader,
CgFX,
FX,
effect
Author(s): Karsten Schwenk
Date: 2008-01-05
Summary: This tutorial shows you how to use PackagedShader to shade geometry with CgFX effects. It assumes the reader has a basic working knowledge of CgFX and AppearancePropertyNode.
Introduction
PackagedShader is designed as a wrapper to popular effect files like Microsoft's FX and NVidia's CgFX. Currently only CgFX is supported in intantreality. Please also note that this is an experimental feature that is only available on Windows and MacOS.
What is CgFX?
CgFX is an effect framework developed and maintained by NVidia. It supports OpenGL and Direct3D and uses Cg as its shader language. CgFX files are a flexible and convenient way to provide a material description, much like an Appearance in x3d. A CgFX effect can contain shaders, states, (default) textures and parameters, fallback techniques for weaker hardware, and more. More information can be found on NVidia's Cg page.
What are the benefits of using CgFX?
Powerful authoring and debugging tools are available for CgFX effects, like NVidia's FX Composer. Using CgFX also allows to exchange shaders (or complete materials for that matter) with applications that do not support x3d but CgFX. Additionally, there are already many effects available, e.g. from NVidia's Shader Library. In my opinion, Cg also makes it easier to manage larger shader utility libraries, because it features a complete C-style preprocessor (including #include directives) and (primitive but useful) interface classes.
The diagram below shows how CgFX effects fit into the instantreality framework. Note that no file conversions are needed.
Basic examples
This section illustrates the basic concepts behind PackagedShader's CgFX support.Blinking Earth
Probably the easiest way of demonstrating how to use a CgFX effect with PackagedShader is by example. The example below should give you a sphere with an earth texture blinking in magenta. Please bear in mind that this example is meant to show basic concepts, not to illustrate the full power of CgFX. A zipped archive containing all files necessary to run the example is available here.

Code: A simple example
<?xml version="1.0" encoding="UTF-8"?>
<X3D version="3.0">
<head>
<meta content="" name="info"/>
</head>
<Scene DEF="scene">
<Shape>
<Appearance>
<ImageTexture DEF="earth" url="earth.png"/>
<PackagedShader DEF="blinkeffect" url="simple_multipass.cgfx"
language="CGFX">
<field accessType="inputOutput" name="__technique__"
type="SFInt32" value="0"/>
<field accessType="inputOutput" name="__compilerOptions__"
type="MFString" value=""-DAVALON""/>
<field accessType="inputOutput" name="__additionalIncludeDirectories__"
type="MFString" value=""/myshaderlibrary/include""/>
<field accessType="inputOutput" name="BlinkScale"
type="SFFloat" value="0.0"/>
<field accessType="inputOutput" name="BlinkColor"
type="SFVec3f" value="1 0 1"/>
<field accessType="inputOutput" name="TestSampler" type="SFNode" >
<ImageTexture USE="earth"/>
</field>
</PackagedShader>
</Appearance>
<Sphere/>
</Shape>
<TimeSensor DEF="timer"
cycleInterval='1'
loop='TRUE'
startTime='0'
stopTime='0'
pauseTime='0'
resumeTime='0'
triggerName='Timer'
description=''
enabled='TRUE'
logFeature=''
/>
<ScalarInterpolator DEF="int" keyValue="0, 1" key="0, 1" />
<ROUTE fromNode='timer' fromField='fraction_changed' toNode='int' toField='set_fraction'/>
<ROUTE fromNode='int' fromField='value_changed' toNode='blinkeffect' toField='BlinkScale'/>
</Scene>
</X3D>
Let's go through the code step by step and see what is happening.
The first interesting thing is the definition of the ImageTexture node inside the Appearance. This is how you can define textures to be used by the effect. Doing it this way also has the benefit that the chunks of the texture definitions are used as a fallback if the effect cannot be created for some reason.
The PackagedShader then defines a CGFX effect. The url attribute should point the url of the CgFX file and the language can be set to CGFX (which is the default anyways). The effect contains only a simple two-pass technique. The first pass renders the textured sphere, the second pass blends the blinking sphere on top of it. You can view the CgFX file's content in the Supplementary Material section at the bottom of this page.
Next come three fields that are somewhat special: __technique__, __compilerOptions__, and __compilerOptions__. These are reserved names that are not shader parameters, but used the control the effect itself.
As you might have guessed, __technique__ sets the technique to be used (currently you can only set this by index, not by name). If the specified technique does not validate, the remaining techniques of the effect are tried in order of appearance to find a fallback solution.
The __compilerOptions__ field sets command-line options for the effect compiler. It is most useful to specify preprocessor definitions, set include paths, and specifying debug/optimization flags. (See Known Issues below for a note on include files.) Note that changes to this field will trigger a recompilation of the effect, so you shouldn't change it every frame.
__additionalIncludeDirectories__ can be used to specify - believe it or not - additional include directories. The advantage of this field over the '-I' option for the effect compiler is that directories which are specified via __additionalIncludeDirectories__ are searched on the client machine and do not have to be present on all machines that compile an effect (e.g. the servers in a cluster). Note that this feature requires Cg 2.1 or later.
The following fields (BlinkScale and BlinkColor) are the shader parameters in the usual way, i.e. the fields are mapped to actual effect parameters by their names. If you do not explicitly set the value of an effect parameter, it's default value (if provided in the CgFX file) is used. This also applies to sampler parameters. Members of structs and array elementes are accessed like you would do it from within the shader. For example structure.member or array[23].foo.
The TestSampler field references the previously declared ImageTexture and binds it to the effect's TestSampler sampler declaration. You can use any texture type as long as it is compatible with the sampler declaration in the effect. An alternative way of specifying a texture is by providing the filename directly in an SFString field:
<field accessType="inputOutput" name="TestSampler" type="SFString" value="earth.png"/>
The rest of the example just makes the sphere blink so we won't discuss it here.
Goochy Flipper
Most CgFX effects can quite easily be used with PackagedShader. For example, here are the steps necessary to apply the 'goochy' effect from nVidia's shader library to our flipper geometry.
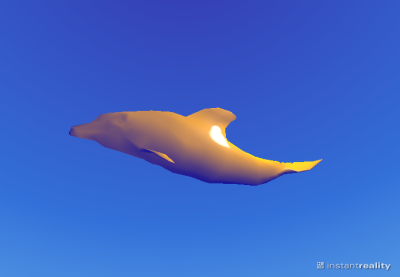
Get the 'goochy' CgFX effect from here, download the flipper.x3d file, and put them in one directory.
Open flipper.x3d and replace the Material at line 52 with the following code.
<PackagedShader url="goochy.cgfx" language="CGFX">
  <field accessType="inputOutput" name="gLamp0Pos" type="SFVec3f" value="200 200 200"/>
</PackagedShader>
If you view the file now you should see something similar to the screenshot above.
Advanced features
This section covers advanced topics, e.g. how to use Cg's shader interfaces with PackagedShader.Shader Interfaces
Cg's shader interfaces are very useful to write generic library functions. In syntax they are similar to Java interfaces, but they function more like C++ templates. In particular they are a compile time mechanism and do not support runtime-polymorphism. See the reference manual on NVidia's Cg page for details.
Say we wanted to write a function that calculates the reflection from a given surface point due to direct illumination from a given light source. This calculation depends on
- the local surface geometry,
- the surface's BRDF,
- and the light.
To describe the geometry a simple struct will suffice, but for the light and the BRDF polymorphism would be nice. Assuming we had the interfaces Light and BRDF we could calculate the reflectance like this (think of Spectrum as a simple float3 rgb vector):
// Computes the radiance that is reflected in direction omega_o
// from a differential surface when it is illuminated by a light source.
Spectrum LocalReflectance(
    in DifferentialSurface surface,
    in BRDF brdf,
    in Light light,
    in float3 omega_o
    )
{
    if( dot( surface.n, omega_o ) < 0.f )
        return 0.f;

    float3 omega_i = 0.f;
    Spectrum L_i = light.GetRadiance( omega_i, surface );

    Spectrum f_r = brdf.Evaluate( surface, omega_i, omega_o );

    float NdotL = max( 0.0, dot( surface.n, omega_i ) );
    return f_r * L_i * NdotL;
}
Cg allows us to define the interface Light like this:
// A generic light interface.
interface Light
{
    // Returns the radiance arriving at 'surface' from
    // this light (from direction 'omega_i').
    // It is assumed that that the radiance function of
    // the light contains a Dirac-delta (so omega_i is unambiguous).
    Spectrum GetRadiance(
        out float3 omega_i,
        in DifferentialSurface surface
        );
};
The definition of BRDF is analogously:
// A generic BRDF interface.
interface BRDF
{
    // Evaluate the BRDF at 'surface' for incident direction
    // 'omega_i' and outgoing direction 'omega_o'.
    Spectrum Evaluate(
        in DifferentialSurface surface,
        in float3 omega_i,
        in float3 omega_o
    );

};
An implementation of Light for a directional light could look like this:
struct DirectionalLight: Light
{
// private:
	float3 direction;
	Spectrum radiance;

// Light interface
	Spectrum GetRadiance(
		out float3 omega_i,
		in DifferentialSurface surface
		)
	{
		omega_i = direction;
		return radiance;
	}
};
With this mechanism we can use LocalReflectance with all types of light sources and brdfs without any branching or changes to the code.
Now the question arises how we tell the effect compiler which implementation we want to use for our interface variables. The types for interface variables are simply specified as SFString fields, much like ordinary shader parameters. So if we had a variable Light light in our effect and wanted to use the implementation DirectionalLight given above, we would add this field to the corresponding PackagedShader:
<field accessType="inputOutput" name="light" type="SFString" value="DirectionalLight"/>
The data members of light can then be set the usual way:
<field accessType="inputOutput" name="light.radiance" type="SFVec3f" value="0 1 0"/>
<field accessType="inputOutput" name="light.direction" type="SFVec3f" value="0.577 0.577 0.577"/>
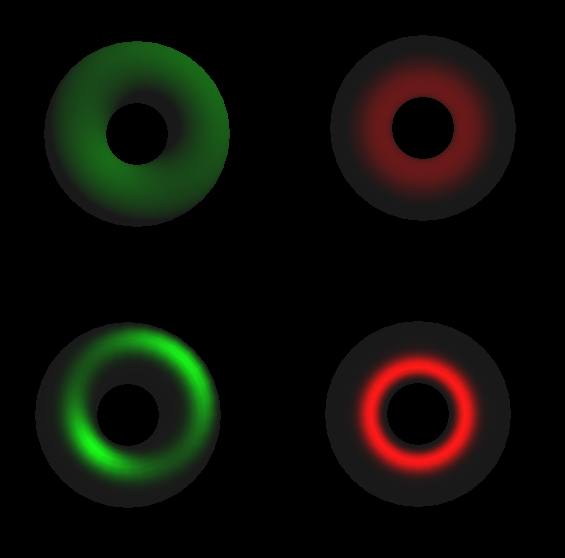
The full source code for this example is available here. Below are four images which were all generated with the same effect code just by changing the implementations of the interfaces.
Known Issues
- SAS-support is limited to the most basic semantics, scripts are not supported at all.
- Texture arrays are not supported.
- Float has to be the base type of all fields specifying numeric shader parameters (e.g. an int2 parameter would be fed by a SFVec3f field).
- + Many, many others we have not discovered yet.
Comments
This tutorial has no comments.
Add a new comment
Due to excessive spamming we have disabled the comment functionality for tutorials. Please use our forum to post any questions.