CommonSurfaceShader
Keywords:
tutorial,
X3D,
rendering
Author(s): Karsten Schwenk
Date: 2012-03-03
Summary: How to use the CommonSurfaceShader and SurfaceShaderTexture nodes.
Introduction
CommonSurfaceShader is a alternative way to specify materials. It can be regarded as a replacement for the Material node with some modern features like normal mapping.
Formally, it is a Shader node (and it goes into the shaders-slot of an appearance), but it does not contain explicit shader code and exposes only a declarative interface, similar to that of the Material node.
The node has quite a lot of fields, which can be overwhelming at first sight, but in your day-to-day work you'll only need a few of them. The fields can be grouped into three components: the core component, the bump mapping component, and the perfect specular component. The core component is basically the BRDF of the surface (Lambertian diffuse part plus Blinn-Phong glossy part) and some additional controls for emission, ambient, and alpha. The bump-mapping component is used to do -- guess what -- bump mapping, i.e. it perturbs shading normals in order to produce apparent bumps in the surface that are not modeled in the geometry. The perfect specular component captures surfaces that are perfect specular reflectors or refractors like glass or water.
You'll notice that most of the fields of the CommonSurfaceShader node come in pairs of a fooFactor and a fooTexture. fooFactor establishes a base value that is constant across the whole surface. fooTexture can be used to modulate this base value per texel. The value read from fooTexture is multiplied by fooFactor. If no fooTexture is present (i.e. it is NULL), fooFactor is used directly. For example there is a diffuseFactor and a diffuseTexture. diffuseFactor is just your normal diffuse color. This is constant across the surface. If you want some spatial variation and want to use a texture for the diffuse color you would just set diffuseFactor to (1,1,1) and diffuseTexture to the texture you want to use. At first sight, it may seem a bit odd to multiply the values instead of using either the one or the other. The reasoning behind the multiplication is that one can easily change foo by just changing fooFactor. For example if you want your object’s diffuse color to fade to black, you can simply let diffuseFactor go to (0,0,0) and your object goes black regardless of whether it uses a texture or not.
Once you understand the fooFactor/fooTexture pairing, most of the fields will make immediate sense to you, if you have a little experience in computer graphics. Therefore, I’ll just discuss some not-so-obvious cases in this tutorial. If questions remain, there are the official examples, the CommonSurfaceShader node documentation, the paper, and the official forums to consult. The examples in this tutorial are available in this zip archive. You should play around with them as you read the tutorial.
Example 1
We’ll start with a rather trivial example.

Code: Simple example (css_tutorial_core.x3d)
<Shape>
  <Sphere DEF='Geo' resolution='2'/>
  <Appearance >
    <TextureTransform scale='2 1' translation='.125 0'/>
    <CommonSurfaceShader
      ambientFactor=".588 .588 .588"
      diffuseFactor=".588 .588 .588"
      specularFactor=".75 .75 .75"
      shininessFactor=".05"

      normalScale='-2 2 2'
      normalBias='1 -1 -1'

      textureTransformEnabled='1'
    >
      <ImageTexture containerField="ambientTexture" url="data/texturez.com/texturez_rust_930.png"/>
      <ImageTexture containerField="diffuseTexture" url="data/texturez.com/texturez_rust_930.png"/>
      <ImageTexture containerField="specularTexture" url="data/texturez.com/texturez_rust_930_spec.png"/>
      <ImageTexture containerField="normalTexture" url="data/texturez.com/texturez_rust_930_nrm.png"/>
    </CommonSurfaceShader>
  </Appearance>
</Shape>
The fields normalScale and normalBias are very useful when working with arbitrary normal maps, as they specify how the normal encoded in the texture should be unpacked. The Basic formula is Ns = normalScale*Nt + normalBias, where Nt is the value read from normalTexture and Ns is the (tangent-space) shading normal. In this particular example, the normal is flipped about the x-axis (i.e. the u texture coordinates).
Another interesting aspect of this example is that it uses a global texture coordinate transform. The TextureTransform is defined as a sibling of the CommonSurfaceShader. If you want to apply such a single global transform to _all_ of a CommonSurfaceShader’s textures, you just have to set the textureTransformEnabled field to true.
But let’s return to the bump-mapping component for a moment. You may wonder how tangents are specified. Currently, there are basically two ways to do this in InstantReality. The first is the simplest: just don’t specify them at all (as done in the example). In this case the shader will try to derive them from the texture coordinates. However, this is not the best solution in term of quality and speed. Usually it’s better to supply them explicitly via 3d texture coordinates. Just augment your geometry with TextureCoordinate3D nodes and refer to these channels in your CommonSurfaceShader by setting tangentTextureCoordinatesId and binormalTextureCoordinatesId. You can also set binormalTextureCoordinatesId to -1 (which is the default), then the implementation will reconstruct the second tangent with a cross product. An example can be found in tangents.x3d.
Example 2
CommonSurfaceShader also allows finer control over the texture sampling process via the SurfaceShaderTexture nodes. Basically, they can stand wherever a “normal” Texture node can stand, but they have a number of additional properties. For example, you can specify a swizzle mask to specify the exact channel(s) that will be used. Consider the following example:
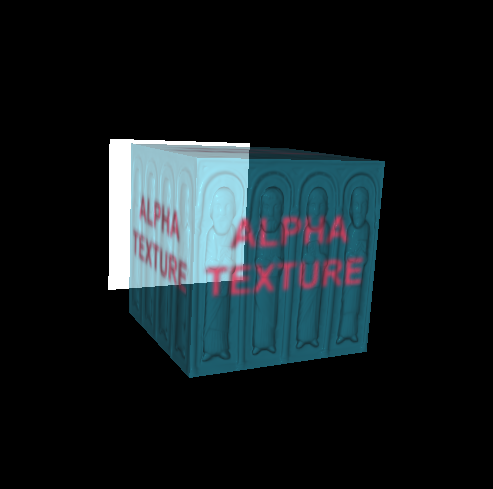
Code: SurfaceShaderTexture example (css_tutorial_alpha.x3d)
<Appearance>
  <CommonSurfaceShader
    diffuseFactor="1 1 1"
    specularFactor="1 1 1"
    shininessFactor=".8"
  >
    <ImageTexture DEF="diff" containerField="diffuseTexture" url="data/alpha.tga"/>
    <ImageTexture USE="diff" containerField="specularTexture"/>
    <SurfaceShaderTexture containerField="alphaTexture" channelMask="a" >
      <TextureTransform scale='1 1'/>
      <ImageTexture USE="diff"/>
    </SurfaceShaderTexture>
    <ImageTexture containerField="normalTexture" url="data/normal_test.tga"/>
  </CommonSurfaceShader>
</Appearance>
Example 3
The final aspect I’d like to discuss in this tutorial is the perfect specular component. Here is a simple glass sphere.
Code: Reflective teapot (css_tutorial_specular.x3d)
<Appearance>
  <CommonSurfaceShader
    ambientFactor='0 0 0'
    diffuseFactor='0 0 0'

    reflectionFactor='1 1 1'
    transmissionFactor='0 0 0'
    environmentFactor='1 1 1'

    relativeIndexOfRefraction='1 1 1'
    fresnelBlend='0'
  >
    <GeneratedCubeMapTexture DEF='GCMT' containerField='environmentTexture' update='always' size='512' useWorldSpaceOrientation='true'>
      <TextureProperties containerField='textureProperties' boundaryModeS='CLAMP' boundaryModeT='CLAMP' boundaryModeR='CLAMP' magnificationFilter='linear' minificationFilter='linear'/>
    </GeneratedCubeMapTexture>
  </CommonSurfaceShader>
</Appearance>
You can blend between two behaviors for the perfect specular component: In the first extreme, transmission and reflection are independent of the angle of incidence. This is not physically correct, but nonetheless sometimes useful. The other extreme is reflection/transmission according to the Fresnel equations. This is physically correct, and you need to specify a refractive index via the field relativeIndexOfRefraction. The parameter that blends between the two extremes is called fresnelBlend.
Files:
Comments
This tutorial has no comments.
Add a new comment
Due to excessive spamming we have disabled the comment functionality for tutorials. Please use our forum to post any questions.