Developing InstantIO C++-Plugins
Keywords:
Plugins InstantIO devices
Author(s): Johannes Behr,
Peter Eschler,
Tobias Alexander Franke,
Sabine Webel
Date: 2009-02-24
Summary: Short tutorial and template on how to write an InstantIO-Plugin in C++
Introduction
This tutorial should help you to write, build and install an InstantIO C++-Plugin for your own device, device-system, filter or whatever you would like to be a node in the InstantIO network. You can also write plugins in pure Java but this is not the topic of this how-to. Further information and the reference documentation is available in the InstantIO-section of the instantReality page.
Requirements
Warning: For Windows you need to use the Visual Studio 2008 SP1 compiler!
You need a C++ compiler and the InstantIO-SDK, i.e. for Linux and Mac use the current commandline g++ or XCode compiler, and on Windows you need the Visual Studio 2008 SP1 release. The InstantIO-SDK is included in every InstantPlayer package, which you can download from the instantReality download page. You probably have it already installed if you read this document.
Write a plugin
You only need to write a single class to get a new IO-Node. Use the included FooNode.h and FooNode.cpp files as a template.
Nodes in the IO-subsystem are described by a type, have fields for attributes and In/Out-Slots for communication. You can use Routes to connect In-/Out-Slot of the same type (e.g. SFVec3f) to transfer data between Nodes. The exact mapping given below.
The concept is very similar to X3D nodes, however there are some main differences in the IO-subsystem.
First of all the Routes can connect local nodes or different applications running on the same or a network-connected machine. X3D-Routes only connect nodes inside of a single application. Second, routes can connect not just a single In-/Out-Slot, like in X3D, but any number with the help of a flexible wildcard-system. Last but not least, IO-Nodes have different states than X3D-nodes and they are only active if at least one slot is connected.
To implement you own InstantIO node you only really have to know the states and fill in some handler methods. For further explanation look at the manual in the InstantIO-section.
IO-Node states
- SLEEPING The node is constructed and all fields and field-values are available and set.
- RUNNING The node is connected to another node and the data-read/write thread-code is running.
- ERROR Some ERROR occurred. Look e.g. at the web-interface to get more detail.
- DISABLED The node is disabled from outside.
To handle these state changes and to read/write data from/to your node you have to implement the following functions in your node.
IO-State handler
- initialize Use the field-values to initialize your node and build dynamic In/Out-Slots from your current device/system configuration.
- processData Somebody connected a Route and the worker-thread for the node has been started. Every node has a single thread as worker-thread to read and write the data. The processData() method is called by the worker-thread and has to open the device/system and read/write data to/from the Slots.
- shutdown This method is called when the node is dismissed your node. Delete all dynamic In/Out-Slots and do other cleanups.
This should help you to get a first idea. Look at the code and the ADDCODE-comments and really look at the online documentation.
X3D-Field to InstantIO-Slot Mapping
X3D's field types map to the following InstantIO InSlot types (OutSlots map analogously):
| X3D | InstantIO |
|---|---|
| SFBool | InSlot<bool> |
| SFFloat | InSlot<float> |
| SFVec2f | InSlot<Vec2f> |
| SFVec3f | InSlot<Vec3f> |
| SFInt32 | InSlot<long> |
| SFTime | InSlot<Time> |
| SFColor | InSlot<Color> |
| SFColorRGBA | InSlot<ColorRGBA> |
| SFRotation | InSlot<Rotation> |
| SFMatrix4f | InSlot<Matrix4f> |
| SFImage | InSlot<ImagePtr> |
| MFFloat | InSlot<MFFloatPtr> |
| MFVec3f | InSlot<MFVec3fPtr> |
| MFVec2f | InSlot<MFVec2fPtr> |
| MFVec4f | InSlot<MFVec4fPtr> |
| MFInt32 | InSlot<MFInt32Ptr> |
| MFString | InSlot<MFStringPtr> |
| MFRotation | InSlot<MFRotationPtr> |
| MFColor | InSlot<MFColorPtr> |
Build, test and install
Now you have to compile, test and install your plugin. The PluginName must be the node-name plus an ".iio" (for InstantIO) suffix.
Use the included test.x3d or test.wrl to run your plugin. The test plugin produces some random vec3f and rotation data. The test.x3d/wrl example prints the received values on the screen. If the plugin is not loaded you get a simple "Pos: undef, Rot: undef" text

If you successfully compiled and installed the plugin (by copying it into the folder where your executable is located) you will get the random values printed to your screen.

Setting up your build environment
The example package provides a CMake file to create your build environment. You can download CMake here for your operating system. Open up CMake and point it to the plugin source directory. Make sure that the variable IR_ROOT in the CMake window is pointing to the correct installation path of Instant Reality (on Windows this is generally a subpath of C:\Program Files (x86), on Mac /Applications or on Linux in /opt). Configure the project and click Generate to create a project file for your build environment (for instance XCode or Visual Studio).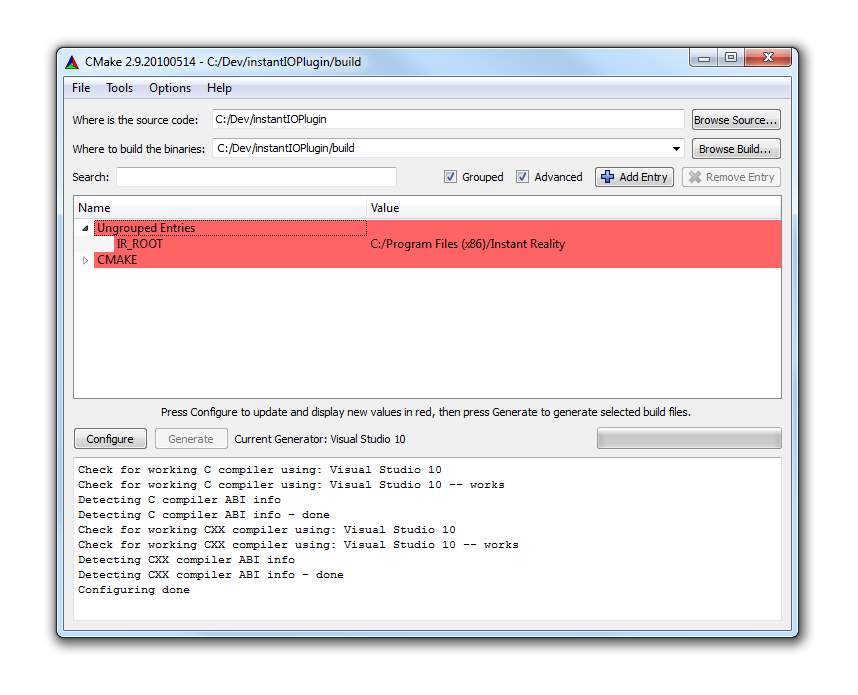
Comments
This tutorial has no comments.
Add a new comment
Due to excessive spamming we have disabled the comment functionality for tutorials. Please use our forum to post any questions.