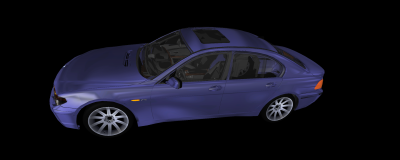
Multiple display cluster
Keywords:
tutorial,
X3D,
engine,
distribution,
cluster,
load balancing,
multi display,
stereo
Author(s): Patrick Riess,
Marcus Roth
Date: 2007-11-29
Summary: This tutorial shows how to setup a cluster for a multi display configuration. It will also implement real load balancing with this setup and extend it to a stereo configuration with five PCs.
Preconditions for this tutorial
Please read the Cluster Basics tutorial in the Clustering category to get an overview of how to configure a PC cluster using InstantCluster. For information about stereo configurations you should take a look into the Multiple Views and Stereo tutorial category (especially Multiple Windows and Views, Stereo Basics and Passive Stereo tutorials).
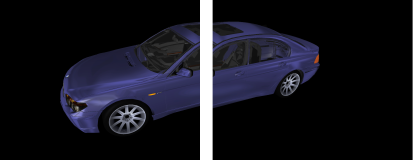
Multi display cluster
In this chapter we want to use three PCs of our cluster to render a scene over two displays. On one PC, just the application will run in a local window to provide interaction. Two other PCs (displaypc1 and displaypc2) are designated to display the scene over two screens.
Different concepts
There are two concepts of doing this. The first one is by using the known ClusterWindow node and the second is the TiledClusterWindow which is especially created for n * m displays arrangements and provides overlapping features. The latter is based on the first one internally and just simplifies the usage on some setups.
So the question is, when to use which node. The following list should get you on the right way. You should use a TiledClusterWindow if:
- you use multiple homogeneous displays to act as one big display
- all displays are in one plane
- above points apply and you want to use stereo
- you don't want to see "borders" between your displays (overlapping projections)
- you use a single display cluster
- you setup a CAVE, i.e. multiple displays, but not in the same plane
- you want to configure view areas manually (e.g. for a CAVE), otherwise TiledClusterWindow is better to use
The main difference is the reduction of work when you have to configure stereo setups in a multi display cluster, because TiledClusterWindow configures view areas and different projection parameters for each area by itself. Another difference is the ability of this node to take overlapping into account. For CAVE setups you have to configure view areas manually, so you are free to arrange CAVE walls as you want. In this tutorial both approaches will be explained and you will soon realize the advantage of the TiledClusterWindow.
Using ClusterWindow
The appropriate RenderJob section will look like this:
Code: Multi display cluster configuration using ClusterWindow
...
DEF render RenderJob {
   windowGroups [
    WindowGroup {
      windows [
        LocalWindow {
          #This window is just for interaction
          enabled FALSE
        }
        ClusterWindow {
          servers [ "displaypc1" "displaypc2" ]
          size 1024 768
          hServers 2
          vServers 1
        }
      ]
    }
   ]
}
...
We see two windows here, the first one is the LocalWindow, which only exists for user interaction. We disable rendering here, otherwise the PC with the local window would have to render the whole scene itself. This can be a problem with large models, especially when using load balancing for the cluster later.
The important part of the configuration is the ClusterWindow. This line
servers [ "displaypc1" "displaypc2" ]
lists the hostnames of PCs, which should take part in the cluster. It is followed by the specification of the display area by setting the number of horizontal and vertical displays:
size 1024 768
hServers 2
vServers 1
By setting hServers to 2 and vServers to 1, the whole window consists of two horizontal aligned displays. As there are just two displays (hServers * vServers), the first two servers (displaypc1 and displaypc2) are responsible for displaying the window area which is as large as the specified window size multiplied with hServers and vServers. Here the whole window area is 2048 x 768 pixels. Alternatively you can use the option fullscreen TRUE to expand the window area over both displays completely. The local window is opened on the machine from where the VRML file is loaded.
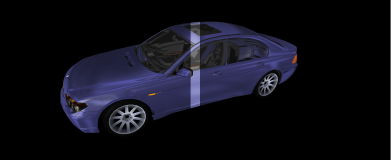
Using TiledClusterWindow
The appropriate RenderJob section will look like this:
Code: Multi display cluster configuration using TiledClusterWindow
...
DEF render RenderJob {
   windowGroups [
    WindowGroup {
      windows [
        LocalWindow {
          #This window is just for interaction
          enabled FALSE
        }
        TiledClusterWindow {
          servers [ "displaypc1" "displaypc2" ]
          fullScreen TRUE
          columns 2
          rows 1
        }
      ]
    }
   ]
}
...
In this configuration the tiled window has 2 columns and 1 row as in the ClusterWindow case. When using the TiledClusterWindow, there are a few additional options, like overlapping:
Code: Overlapping in TiledClusterWindow
overlapX 20
overlapY 0
These lines result in a region between the two displays which is rendered twice. So when using two video beamers, you can adjust these by taking the overlapping into account and an intersection will not be as noticable as without overlaps.
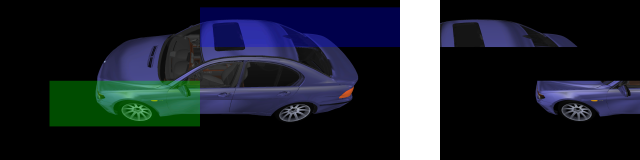
Load balancing
The next two lines set up the load balancing, where the field showBalancing is just for debugging purpose and pigments those areas of the rendered image which are generated by other servers and copied over the network. You just have to add these into the ClusterWindow node or TiledClusterWindow respectively.
Code: Load balancing
balance TRUE
showBalancing TRUE
That means both cluster PCs support each other by rendering parts of the scene on their local framebuffer and sending the results (pixels of the image region) back. The role changes depending on which PC has the higher load.
If you want to use load balancing in a multi display setup you should enable fullScreen option and adjust the size field to the overall resolution in the ClusterWindow.
Code: Display size in ClusterWindow
size 2048 768
fullScreen TRUE
hServers 2
vServers 1
In TiledClusterWindow the size of the window is defined by setting the width and height of one tile. Together with columns and rows fields the window size is calculated internally:
Code: Tile size in TiledClusterWindow
fullScreen TRUE
tileWidth 1024
tileHeight 768
Tile sizes have usually to be adapted to the native resolution of one single display.
We will also attach an additional PC which is only used as support for the display PCs. We write the PC's name at the end of the servers list, because the first (defined through hServer/vServers or rows/columns) servers are automatically used as display.
servers [ "displaypc1" "displaypc2" "supportpc" ]
Important: Load balancing in multi display setups currently only works in fullscreen.
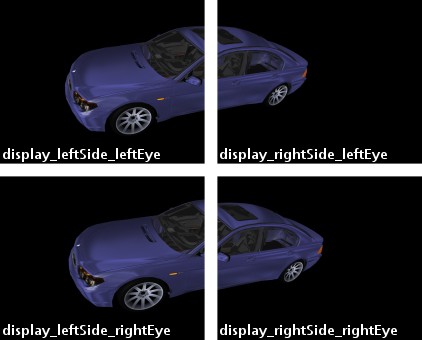
Multi display stereo configuration
In a stereo configuration the existance of TiledClusterWindow will become clear. Imagine a stereo setup of two displays, i.e. two PCs for the displays of the left eye and two PCs for the displays of the right eye. One display (one tile) has the resolution of 1280 x 1024 pixels, so the whole window will have 2560 x 1024.
To foreclose the solution with a TiledClusterWindow here is the simple configuration:
Code: Stereo with two displays using TiledClusterWindow
...
DEF render RenderJob {
   windowGroups [
    WindowGroup {
      windows [
        LocalWindow {
          #This window is just for interaction
          enabled FALSE
        }
        TiledClusterWindow {
          servers [ "display_leftSide_leftEye"
                    "display_leftSide_rightEye"
                    "display_rightSide_leftEye"
                    "display_rightSide_rightEye" ]
          fullScreen TRUE
          tileWidth 1280
          tileHeight 1024
          stereo TRUE
          eyeSeparation 0.08
          zeroParallaxDistance 1
          columns 2
          rows 1
        }
      ]
    }
   ]
}
...
The role of a server in the servers list is well defined here. If stereo is set to TRUE, the first server (display_leftSide_leftEye) will render the left eye camera of the first display, second server (display_leftSide_rightEye) will render the right eye camera of the first display. With third and fourth servers it's the same but for the right side. In a grid of m columns and n rows of displays the first one is always lower left and the last one upper right. Additional servers are only used by load balancing if it is switched on.
The ClusterWindow approach is more flexible as you can setup view areas which can be stereo or not. You can try to setup the above scenario to get the same result on the displays using ClusterWindow, but you might not want to. A hint: You'll need a window with four displays fitting in and four viewports each modified by a ProjectionViewModifier. How this is done and where you will need this is discussed in the next tutorial for setting up a CAVE environment.
Files:
Comments
This tutorial has no comments.
Add a new comment
Due to excessive spamming we have disabled the comment functionality for tutorials. Please use our forum to post any questions.