Passive Stereo
Keywords:
tutorial,
X3D,
world,
engine,
stereo,
passive,
multi view
Author(s): Marcus Roth,
Patrick Riess
Date: 2007-11-27
Summary: This tutorial describes the configuration of the engine to achieve a passive stereoscopic view of scenes. It will distinguish between overlapped view areas and separated side by side view areas. The first one is performed by splitting color channels and using red/blue glasses. The latter can be used to achieve a stereo setup with two video beamers and appropriate filters for example. You should also check the preconditions for this tutorial.
Preconditions for this tutorial
Please read the tutorials "Multiple Windows and Views" as well as "Stereo Basics" in this category to get a good overview about stereo approaches and basic configuration issues regarding multiple views in Instant Reality. Notice that this tutorial is just about passive stereo.
Stereo modifier
If we want to do stereo, then we need two view areas. One for the left eye and one for the right eye. For stereo it is neccessary to modify viewing parameters. For this kind of modification there exists a number of modifiers in Instant Reality. For a simple stereo projection we have to use the ShearedStereoViewModifier:
Code: ShearedStereoViewModifier node
...
Viewarea {
  modifier [
    ShearedStereoViewModifier {
       leftEye  TRUE
       rightEye FALSE
       eyeSeparation 0.08
       zeroParallaxDistance 1
    }
  ]
}
...
Depending on the eye which should be represented by this modifier, leftEye and rightEye has to be set to TRUE or FALSE. zeroParallaxDistance and eyeSeparation values are in metres, so they have good default values, if your scene is also modeled in metres. Otherwise you could either adapt the values or as a better approach, you should use a NavigationInfo node in the Scene namespace and set the sceneScale field to 0.01 if the scene is modeled in centimetres or 0.001 if the scene is modeled in millimetres and so on. The advantage is you can keep the stereo configuration fix for your setup and each scene and just need to change one value.
Code: NavigationInfo node
...
Scene {
  children [
    NavigationInfo {
      sceneScale 0.01
    }
    ...
  ]
}
Stereo by overlapping view areas
To receive a simple red/blue stereoscopic view, we have to overlap two view areas, display only one color channel per area (red or blue) and put a ShearedStereoViewModifier into both areas. After all the code looks like this:
Code: Color channel based stereoscopic view with overlapping view areas
...
DEF render RenderJob {
  windowGroups [
    WindowGroup {
      windows [
        LocalWindow {
          views [
            Viewarea {
              red TRUE
              green FALSE
              blue FALSE
              lowerLeft  0 0
              upperRight 1 1
              modifier [
                ShearedStereoViewModifier {
                  leftEye TRUE
                  rightEye FALSE
                }
              ]
            }
            Viewarea {
              red FALSE
              green FALSE
              blue TRUE
              lowerLeft  0 0
              upperRight 1 1
              modifier [
                ShearedStereoViewModifier {
                  leftEye FALSE
                  rightEye TRUE
                }
              ]
            }
          ]
        }
      ]
    }
  ]
}
...
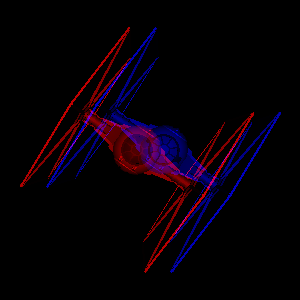
The result will look like this. Everything you need now are some glasses with a red foil for the left eye and a blue foil for the right eye.
Stereo by separate view areas
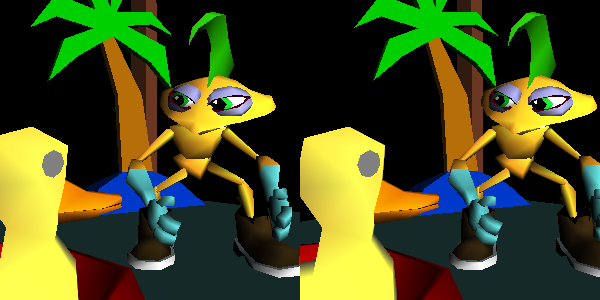
Splitting color channels is the fastest variant of stereoscopic viewing. But we get much better results if we use the full color of "left" and "right" images. That's the reason why we render both images side-by-side, choose our output device, let's say a graphics card with two outputs and a video beamer on each output. The beamer images are then superposed. To receive only one image per eye we use polarization or color spectrum filters (see Stereo Basics tutorial) in front of the beamers and in front of our eyes.
To be able to show the image for the left eye on the left side of our window and the image for the right eye on the right side, we use two view areas again. The first is located from 0 - 0.5 and the second from 0.5 to 1.
Code: Stereo configuration
...
LocalWindow {
  size 600 300
  views [
    Viewarea {
      lowerLeft  0   0
      upperRight 0.5 1
      modifier [
        ShearedStereoViewModifier {
          leftEye  TRUE
          rightEye FALSE
        }
      ]
    }
    Viewarea {
      lowerLeft  0.5 0
      upperRight 1   1
      modifier [
        ShearedStereoViewModifier {
          leftEye  FALSE
          rightEye TRUE
        }
      ]
    }
  ]
}
...
Your graphics card has to be configured so that the left side of the desktop is visible on the left output and the right side of the desktop is visible on the right graphics output. Additionally the size of the window must cover the whole desktop. This can be done by the following code.
Code: Fullscreen local window
...
LocalWindow {
  fullScreen TRUE
}
...
Now we have a simple stereo setup. The disadvantage is that a single PC is responsible for the simulation and the rendering of two images per frame. We can get a much better performance, if we are using 3 (or more) hosts where one is responsible for the simulation, one to calculate the right eye image and one to calculate the left eye image. To find out more about this, read the tutorials in the Cluster section.
Files:
Comments
This tutorial has no comments.
Add a new comment
Due to excessive spamming we have disabled the comment functionality for tutorials. Please use our forum to post any questions.