Serial Communication
Keywords:
Instant IO,
interaction,
serial,
devices,
rs232,
arduino
Author(s): Michael Zoellner
Date: 2007-02-01
Summary: This tutorial shows you how to communicate with a serial device.
Introduction
This tutorial shows how to communicate with a serial device within a 3D scene. Possible devices are microcontroller boards like Arduino or Wiring, but also for example Wacom tablets, GPS devices and rotary encoders.
Setting up the serial port
The serial port is set up with an IOSensor node at the beginning of the scene. The following parameters are available:
- Device: A number starting at 0 specifying the serial interface to use. 0 for COM1 or the first tty serial device. (default: 0)
- BaudRate: Baud rate of the serial port. 9600, 19200, ... (default: 9600)
- DataBits: Number of data bits used for the communication on the serial port. Possible values are 7 or 8. (default: 8)
- Parity: Type of parity used for the communication on the serial port. Possible values are even, odd or none. (default: none)
- StopBits: Number of stop bits used for the communication on the serial port. Possible values are 1 or 2. (default: 1)
- Handshake: Type of handshake (flow control). Possible values are none, hardware or software. (default: none)
- DTR: The status of the DTR line.
- RTS: The status of the RTS line.
- Init String: A initialisation string that is send to the serial device to start operation.
- Deinit String: A deinitialisation string that is send to the serial device to stop operation.
- Delimiter: Ascii value of the character that splits the serial message (default: no delimiter)
- MaxBytes: The maximum number of bytes a message consists of. A value of -1 means that there is no maximum number of bytes. (default: -1)
Code: Serial IOSensor in X3D encoding
<IOSensor DEF='serial' type='serial' Device='0' Delimiter='10' BaudRate='9600'>
	<field accessType='outputOnly' name='Data out' type='SFString'/>
	<field accessType='inputOnly' name='Data in' type='SFString'/>
</IOSensor>
Here we are seeting up a serial device with 9600 baud rate at COM1 or tty.usbserial-00001. The delimiter is set to a line break (ASCII value: 10). All other parameters have the default values.
There are two fields for the incoming and outgoing data:
- Data out: Data from the serial device to the scene
- Data in: Data from the scene to the serial device
Sending Data to the Serial Port
By routing the KeySensors' keyPress field to the serial devices' Data in field we are sending each keystroke (SFString) to the serial port. We also specify a name for the device handler via the name field.
Code: Sending data to the serial device
<KeySensor DEF='keysensor' />
<ROUTE fromNode='keysensor' fromField='keyPress' toNode='serial' toField='Data in'/>
Receiving Data from the Serial Port
In order to get the data from the serial port and to show it in the scene we are routing the values from the serial devices' Data out field to a Text nodes' string field.
Code: Sending data to the serial device
<Transform>
	<Shape>
    	<Text DEF='text' string='' solid='true'>
    </Shape>
</Transform>

<ROUTE fromNode='serial' fromField='Data out' toNode='text' toField='string'/>
Example Scene
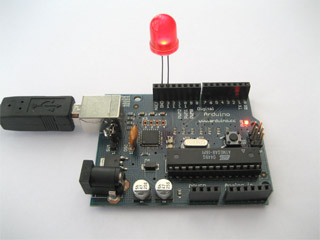
This is a simple example for the communication between an Arduino microcontroller and instantviewer. We are sending keystrokes from the scene to the controller. The software on the Arduino board switches an LED on when "1" is sent and switches it off when "2" is sent. It sends the Strings "On" and "Off" back to the scene where it is routed on a Text node's string.
Code: Basic X3D scene
<X3D>
  <Scene DEF='scene'>

    <IOSensor DEF='serial' type='serial' Device='0' Delimiter='10' BaudRate='9600'>
    	<field accessType='outputOnly' name='Data out' type='SFString'/>
    	<field accessType='inputOnly' name='Data in' type='SFString'/>
    </IOSensor>

    <Viewpoint position='0.625 0.3 1.9' />

    <Transform>
    	<Shape>
    		<Appearance>
    			<Material diffuseColor='1 1 1' />
    		</Appearance>
    		<Text DEF='text' string='/../' solid='true'>
    			<FontStyle justify='BEGIN' family='SANS' />
    		</Text>
    	</Shape>
    </Transform>

    <ROUTE fromNode='serial' fromField='Data out' toNode='text' toField='string'/>


    <KeySensor DEF='keysensor' />
    <ROUTE fromNode='keysensor' fromField='keyPress' toNode='serial' toField='Data in'/>

  </Scene>
</X3D>

Code: Arduino Code
void setup()
{
  Serial.begin(9600);
  pinMode(13, OUTPUT);
}

void loop()
{
  if (Serial.available() > 0)
  {
    int incoming = Serial.read();

    if ((char)incoming == '1')
    {
      digitalWrite(13, HIGH);
      Serial.println("On");
    }
    else if ((char)incoming == '2')
    {
      digitalWrite(13, LOW);
      Serial.println("Off");
    }
  }
}
Comments
This tutorial has no comments.
Add a new comment
Due to excessive spamming we have disabled the comment functionality for tutorials. Please use our forum to post any questions.