Hair Simulation
Keywords:
hair simulation,
hair rendering,
virtual humans
Author(s): Yvonne Jung
Date: 2007-11-29
Summary: This tutorial shows how to use the hair simulation and rendering system.
Introduction
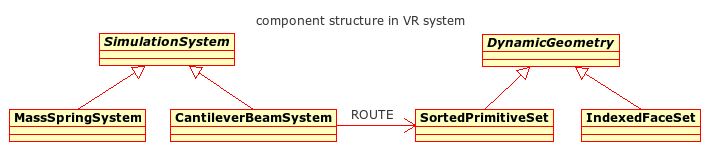
For simulating and rendering human hair basically two nodes are needed:
- the CantileverBeamSystem for simulation;
- the SortedPrimitiveSet for rendering.
The CantileverBeamSystem internally is based on a kinematic chain for simulating things with hair-like behaviour (drafted in the middle of the next image below). The nodes of the multi-body chain are defined by the vertices of the original geometry. Two types are distinguished, anchors and free moving vertices. Anchors (i.e. the hair roots) are connected to the scalp, whereas all other vertices in the chain are free moving, due to external forces like gravity, and by applying the length conservation constraint. Because this node only does the simulation but not the rendering, the output has to be routed to specialized rendering nodes. Therefore the simulator is best used together with the SortedPrimitiveSet node for rendering purposes as shown in the following image.
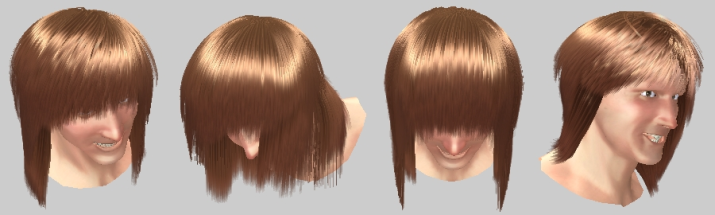
Please note: Currently only smooth hairstyles, like the one shown above, can be simulated.
Modelling
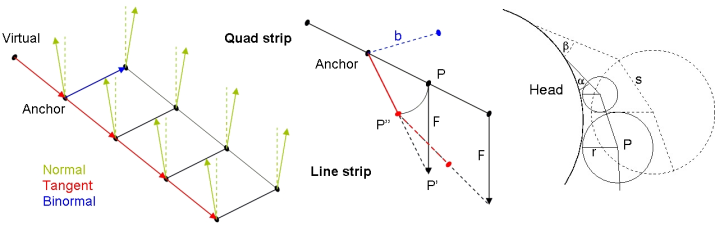
A person usually has more than 100,000 hairs, which cannot be simulated in real-time. In order to reduce geometric complexity and to avoid rendering problems hair wisps are modelled as small quad strips (see left image below, the 'virtual' vertex is not to be modelled but inserted by the CantileverBeamSystem). For creating an inital hair style that can be simulated, you can model it by hand (all you need is a set of quad strips and the corresponding indices, which have to be pasted in the 'coord' and 'index' field respectively). Alternatively you can use tools like e.g. "Hair Department" for C4D; or you can use our special hair creation plugin (also for C4D) that can be found for download at the end of this tutorial in the files section. There you also find a sample export template which should be adapted to yout own needs.
Warning: Our C4D plugin is unsupported, the documentation (manual and video) is in German only, besides this the plugin only runs on windows, and was only tested on XP/ SP2 with Cinema4D R9.
Simulation
The following code example shows the usage of the CantileverBeamSystem node for hair simulation, which is derived from the abstract SimulationSystem node.
The 'speed' field is a scaling factor for the simulation speed. The 'localCoordSystem' field defines if calculations (e.g. gravitation, given by the 'gravity' field, or forces like wind, given by the 'externalForce' field) shall be evaluated in the local or global coordinate frame. If the world coordinate system is chosen (which is essential if movements due to coordinate transformations shall be treated as forces acting on the system), it is useful, as shown in the next code example, to use an InverseWorldTransform node as parent Transform for the rendering component, because for speed-up the output (i.e. the coordinates, normals and tangents) of the simulator is already in world coordinates.
Code: Simulation component
DEF simu CantileverBeamSystem {
    speed 1.0
    localCoordSystem FALSE
    collisionDomainType ["sphere" "sphere"]
    collisionDomainParam [
        -0.3 2.96 0.67, 4.4135 0
        -0.3 3.0 1.86, 4.28995 0
    ]
    gravity 0 -10 0
    externalForce 0 0 0
    minBend 0.05
    maxBend 0.1
    massRadius 0.9
    coord [
        #...
    ]
    index [
        #...
    ]
    normal [ 0 0 0 ]
    color [ 1 1 1 ]
}
Besides a convincing simulation a natural behavior in case of collisions is also required. Collisions with the body are a hard constraint and must be treated explicitly. Thus for approximation objects like spheres, ellipsoids and planes, for which intersection tests can be handled efficiently, are used. Therefore, with the 'collisionDomainType' and field collision objects can be specified. Currently three types can be used: SPHERE, ELLIPSOID, PLANE. With the 'collisionDomainParam' field parameters like center and radius for defining a parametric collision object can be defined; if the last param is > 0 this means the object is disconnected (like e.g. a table), else connected (like e.g. the head) to the simulation.
Hair-hair collision can't be handled easily in real-time. Thus the interpenetration of hair wisps is avoided by using a slightly different bending factor for every chain (defined by the 'minBend' and 'maxBend' fields), based on the position of its respective anchor, and by arranging hair strips on top of the scalp in different layers within a different distance to the head. For keeping this up during dynamics, each vertex, depending on its position, is assigned a virtual collision sphere with a different radius (defined by the 'massRadius' field), in order to parameterize the distance between connected vertices and to the head individually (as depicted in the right image below).
Rendering
For creating an impression of thin, semi-transparent hair, textures with hair-like transparent patterns can be mapped onto the hair patches. To provide an impression of hair volume, alpha blending is used, which requires correct back-to-front sorting of the hair wisps. Therefore the SortedPrimitiveSet node contains the 'drawOrder' field. But back to front sorting of the quad strips arises another artifact, caused by the relatively large extension of the surface compared to one single reference point chosen for sorting purposes. This can be alleviated by sorting the uppermost strips along the head's upvector in a second step. To our experience a factor of about fifteen percent produces quite satisfactory results. Therefore the 'upThreshold' field is used. The first three values define the upvector, and the fourth value defines the percentage. Here it can be chosen between two sorting schemes by switching the sign of this parameter; if negative, a faster scheme is used. The 'lowerBound' field specifies the percentage of not rendered primitives behind the head for rendering speed-up. The other fields, like 'coord' etc. are updated by the simulation (see also last code section).
However, for simulated quad strips no unique sorting order can be determined and therefore severe sorting artifacts may result. Many artifacts can be alleviated by a multi-pass approach. So, please have a look at the MultiPassAppearance in the next example. Although this is only suitable for presorted hair without animation, in combination with the already explained sorting steps it leads to good results. After rendering all back-facing polygons with depth writes disabled and depth test set to "less", the front-facing polygons are rendered. This is accomplished by means of the MultiPassAppearance node and the additional use of special render mode nodes like the FaceMode, the BlendMode and the DepthMode for fine grained render state control.
Code: Rendering component
DEF IWT InverseWorldTransform {
    children [
        DEF HairTrafo Transform {
            children [
                Shape {
                    appearance MultiPassAppearance {
                        appearance [
                            DEF Hair_Appearance1 Appearance {
                                faceMode FaceMode {
                                    cullFace "auto"
                                    smooth FALSE
                                }
                                blendMode DEF Blend BlendMode {
                                    srcFactor "src_alpha"
                                    destFactor "one_minus_src_alpha"
                                }
                                depthMode DepthMode {
                                    readOnly TRUE
                                    depthFunc "lequal"
                                }
                                texture DEF HairTex MultiTexture {
                                    texture [
                                        ImageTexture {
                                            url "hair.tif"
                                        }
                                        ImageTexture {
                                            url "noise.tif"
                                        }
                                    ]
                                }
                                shaders [
                                    DEF HairShader ComposedShader {
                                        exposedField SFInt32 hairTex 0
                                        exposedField SFInt32 noiseTex 1
                                        #...
                                        parts [
                                            #...
                                        ]
                                    }
                                ]
                            }
                            DEF Hair_Appearance2 Appearance {
                                faceMode FaceMode {
                                    cullFace "front"
                                    smooth FALSE
                                }
                                blendMode USE Blend
                                depthMode DepthMode {
                                    readOnly TRUE
                                    depthFunc "lequal"
                                }
                                texture USE HairTex
                                shaders USE HairShader
                            }
                        ]
                    }
                    geometry DEF HairSet SortedPrimitiveSet {
                        upThreshold 0 1 0 -0.88
                        mode "QuadSet"
                        drawOrder "BackToFront"
                        lowerBound 0.01
                        coord DEF coord Coordinate {
                            point [ 0 0 0 ]
                        }
                        refPoint DEF refPoint Coordinate {
                            point [ 0 0 0 ]
                        }
                        normal DEF normal Normal {
                            vector [ 0 1 0 ]
                        }
                        tangent DEF tangent Normal {
                            vector [ 0 1 0 ]
                        }
                        texCoord DEF texCoord TextureCoordinate {
                            point [ 0 0 ]
                        }
                        color DEF color Color {
                            color [ 1 1 1 ]
                        }
                    }
                }
            ]
        }
    ]
}
As can be seen in the next code fragment, most of the geometry properties fields like 'normal', 'tangent' etc. are calculated and updated by the simulation. An exception is the 'index' field, which holds the topological information, the 'coord' field, which contains the original vertex positions, and the 'color' field, with which additional per vertex colors can be defined.
Because on the one hand tangents are very important for implementing a hair shader, but on the other hand X3D does not provide special vertex attributes for tangents, the SortedPrimitiveSet node provides them on texture unit 1.
Code: Update and Routes
DEF script Script {
    eventOut SFVec3f out_wind
    #...
}

DEF simulation-TIMER TimeSensor {
    cycleInterval 1
    loop TRUE
    enabled TRUE
}

ROUTE simulation-TIMER.time TO simu.set_time       # trigger simulation
ROUTE script.out_wind       TO simu.externalForce  # start little breeze

ROUTE simu.refPoint      TO refPoint.set_point
ROUTE simu.coord_changed TO coord.set_point
ROUTE simu.tangent       TO tangent.set_vector
ROUTE simu.normal        TO normal.set_vector
ROUTE simu.texCoord      TO texCoord.set_point
ROUTE simu.color         TO color.set_color
ROUTE simu.index         TO HairSet.index
The first file links to a hair simulation demo with a special shader for blond hair (the simulation can be stated by clicking the red box, the breeze by clicking the yellow box, and headbanging can be done by interacting with the blue box), whereas the other files belong to the already mentioned hair modelling plugin for C4D.
The installer for the hair creation plugin for Cinema4D R9 which was formerly attached to this tutorial has been moved to the downloads page and can now be grabbed from this location.
Files:
Comments
This tutorial has no comments.
Add a new comment
Due to excessive spamming we have disabled the comment functionality for tutorials. Please use our forum to post any questions.