Space-Mouse/Navigator/Pilot Device
Keywords:
SpaceMouse,
SpaceNavigator,
SpacePilot
Author(s): Patrick Dähne,
Johannes Behr
Date: 2008-01-08
Summary: This tutorial demonstrates how to connect a 3Dconnexion (former LogiCad3D) SpaceMouse, SpaceNavigator, SpacePilot or compatible device to Instant Player.
Introduction
This tutorial demonstrates how to connect a 3Dconnexion (former LogiCad3D) SpaceMouse, SpaceNavigator, SpacePilot or compatible device to Instant Player. There are three different approaches, depending on the type of device and the operating system you are using.
In general all the devices provide 6 degrees. Three axis for translation and three axis for rotation. In addition the devices support a varying number of buttons. Ranging from 2 to more than 20. The man difference is the type of connection.

New devices, e.g. SpaceNavigator and SpacePilot, use an USB connector.
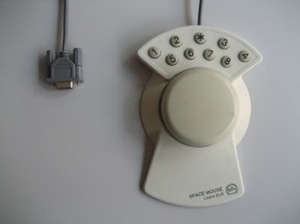
Older devices, like the classic DLR SpaceMouse are usually connected via a serial slot. New devices use an USB connector.
Start the correct device Handler
The correct InstantIO Handler depends on physical device and opperation-system. Look for the "Input/Output streams" tutorials to get more background information about the IOSensor.
USB Device on Windows
The SpaceNavigator backend is the recommended way to connect SpaceNavigator and SpacePilot devices on Windows. It does not exist on Mac OS X or Linux, and it does not work out of the box for classic SpaceMice connected to the serial port.
To get the backend working, first install the appropriate driver from the 3Dconnexion web site (it is actually the same driver for all USB devices, "3DxSoftware 3.x"). Then, integrate an IOSensor node into the scene whose type is "SpaceNavigator":
Code: Integrating the SpaceNavigator backend into the scene
DEF ios IOSensor {
  type "SpaceNavigator"
  eventOut SFFloat X?translation
  eventOut SFFloat Y?translation
  eventOut SFFloat Z?translation
  eventOut SFRotation Rotation
  eventOut SFBool Button??1
  eventOut SFBool Button??2
}
The SpaceNavigator backend has three float outslots that provide values between -1 and 1 for the x, y and z translation of the cap, one rotation outslot for the rotation of the cap, and two boolean outslots for the buttons "1" and "2" of the SpaceNavigator (we currently do not support the other buttons available on other 3Dconnexion devices like the SpacePilot).
USB Device on OSX
The Joystick backend is the recommended way to connect SpaceNavigator and SpacePilot devices on Mac OS X. It does not work on Windows or Linux, and it does not work for classic SpaceMice connected to the serial port.
To get the backend working, do not install any drivers - just integrate an IOSensor node into the scene whose type is "Joystick". In the "device" SFString field, you can either specify the name of the device or its index (0 is the first joystick device in the system, 1 the second, and so on):
Code: Integrating the Joystick backend into the scene
DEF ios IOSensor {
  type "Joystick"
  device "0"
  eventOut SFFloat X-Axis
  eventOut SFFloat Y-Axis
  eventOut SFFloat Z-Axis
  eventOut SFFloat X-Rotation
  eventOut SFFloat Y-Rotation
  eventOut SFFloat Z-Rotation
  eventOut SFBool Button??1
  eventOut SFBool Button??2
}
The Joystick backend has three float outslots that provide values between 0 and 1 for the x, y and z translation of the cap, three float outslots that provide values between 0 and 1 for the x, y and z rotation of the cap, and boolean outslots for each button of the device.
Serial-Device on all Systems
The SpaceMouse backend is the recommended way to connect classic (serial) SpaceMouse devices on all operating systems.
To get the backend working, do not install any drivers - just integrate an IOSensor node into the scene whose type is "SpaceMouse". In the "device" SFString field, you have to specify the serial port the SpaceMouse is connected to (0 is COM1, 1 is COM2, and so on).
Code: Integrating the Joystick driver into the scene
DEF ios IOSensor {
  type "SpaceMouse"
  device "0"
  eventOut SFFloat X?translation
  eventOut SFFloat Y?translation
  eventOut SFFloat Z?translation
  eventOut SFFloat X?rotation
  eventOut SFFloat Y?rotation
  eventOut SFFloat Z?rotation
  eventOut SFBool Button?1
  eventOut SFBool Button?2
  eventOut SFBool Button?3
  eventOut SFBool Button?4
  eventOut SFBool Button?5
  eventOut SFBool Button?6
  eventOut SFBool Button?7
  eventOut SFBool Button?8
}
The SpaceMouse backend has three float outslots that provide values between 0 and 1 for the x, y and z translation of the cap, three float outslots that provide values between 0 and 1 for the x, y and z rotation of the cap, and eight boolean outslots for the buttons "1" - "8" of the device. It is currently not possible to access the "*" button of the device via the IOSensor node.
Side Node: It is also possible to get older (serial) SpaceMouse devices working with the SpaceNavigator backend on Windows, but that involves a little bit of hacking. You have to install the appropriate driver from the 3Dconnexion web site ("3DxSoftware 2.x"). Additionally you have to get and register a library (TDxInput.dll). This library only comes with the drivers for newer (USB) devices ("3DxSoftware 3.x"). So you have to perform the following steps to get older (serial) devices working:
- Get and install the driver for newer (USB) devices ("3DxSoftware 3.x"). As I already said, this driver is the same for all USB devices, so it does not matter whether you choose the driver for the SpaceNavigator, the SpacePilot or any other USB device.
- Locate the library "TDxInput.dll". On an english version of Windows, when you installed the driver into the default location, the location of that library is "C:\Program Files\3Dconnexion\3Dconnexion 3DxSoftware\3DxWare\win32". Copy that library into a safe location.
- Uninstall the 3DxSoftware 3.x driver.
- Get and install the driver for older (serial) devices ("3DxSoftware 2.x").
- Register the library "TDxInput.dll". To to that, you have to log in as an administrator, open the command line, go into the directory that contains the library, and enter the following command: "regsvr32 TDxInput.dll". Do not move the library to another location or remove it from the hard disk - it is registered at that specific location.
Controlling the Application
The IOSensor nodes give you the raw datastreams of the devices. You, as application developer, are totally free to use it to change various application states. You can e.g. navigate the camera, transform BodyPart nodes to trigger PointSensors or change the color of an object according to the current rotation state.
You can use Scripts to code this behavior or use helper Nodes like an SteeringNavigator. Check the "Navigator" and "Immersive PointingSensor Interaction" tutorial for more details.
Attached to this tutorial you find a simple example which shows most usual case. Using a SpaceNavigator/SpacePilot on Windows to control a Navigator while walking/flying in a Virtual Environment
Files:
Comments
This tutorial has no comments.
Add a new comment
Due to excessive spamming we have disabled the comment functionality for tutorials. Please use our forum to post any questions.